Food and Drink
For quick links to ALL Food and Drink posts please use the left side bar and click Labels. Under there click Food and Drink and you will get access to all Food and Drink Posts in a nice layout. Otherwise scroll through to find what you are looking for :)

This chocolate cookie recipe is so good and extremely versatile. I have made it with Reece pieces as well as a mixture of mini marshmallows, white chocolate chips and milk chocolate chips (trying to re create a s'more like taste). They've been a hit in our house every time. I also like how simple the recipe is and that it can all be done in the mixer bowl and I don't have a ton of dishes to do after. I also like the simplicity as it means I can get the boys to help me with them.


If you're going to use marshmallows it does change the consistency of the cookie and makes it chewier. I still liked it, but it definitely gives it a different texture and shape.
Ingredients:
1/2 cup butter (room temperature)
3/4 cup packed brown sugar
1/2 cup white sugar
1 tsp vanilla
2 eggs
1 1/2 cups flour
1/2 cup cocoa powder
1/4 tsp salt
1/2 tsp baking soda
2 cups (whatever your heart desires. We have done Reece pieces, a combination of mini marshmallows white chocolate chips and milk chocolate chips. I'm thinking some salted peanuts would also taste really good in these cookies as well!)
Directions:
1. Heat oven to 350 degrees
2. Put butter and sugars into your bowl and mix until creamed. Add vanilla and eggs and cream together until well mixed.
3. Add flour, cocoa powder, salt and baking soda to the mixture and mix well.
4. Next you are going to add in your filler and mix until there is well spread throughout the cookie dough.
5. Spoon onto cookie sheet and give room for them to spread (especially if using marshmallows. I would also suggest parchment paper if using marshmallows and they melted a lot and got really sticky on the pan). Cook for 9 - 13 minutes depending on the size of your cookies.
6. Move onto cooling rack and enjoy!
This waffle recipe is actually so easy! I make this recipe all the time and the best part is that they freeze really well! I like to cut them into quarters and freeze in a ziplock bag as that makes them easy to access and the perfect size to pop into the toaster to heat up.


Do not over mix your batter but do mix it well enough that everything is mixed well. I know... how do you know when its just right? Well the nice thing about this is the more you make it the better you understand BUT if you do happen to over mix (like I did a lot at the beginning) they still turn out!

Other fun things to add to these waffles is sprinkles, chocolate chips, or blueberries to the batter. You can also add lots of different toppings like blueberry raspberry sauce, bananas, whipped cream, Nutella, any other fruit, sprinkles, the possibilities are endless!


Just think about how fun it will be once we are allowed to have gatherings again to have a waffle bar at a brunch! Or if you don't want to wait for that then you can always have a fun waffle bar at a breakfast with your family.
Ingredients:
1 3/4 cups flour
1 TBSP Baking powder
1/2 tsp salt
1/2 cup melted butter
1 3/4 cups milk
2 eggs
1 tsp vanilla
Directions:
1. Melt butter in microwave.
2. In large bowl mix flour, baking powder and salt together.
3. in a medium bowl mix eggs, vanilla, and milk together. Add melted butter to the wet mixture and then add the wet mixture to the flour mixture and mix. Try not to over mix.
4. Let the batter rest for 5 minutes. While the batter is resting pre heat your waffle iron. Next scoop approximately 1/3 cup of batter onto your waffle iron and cook. (Every waffle iron will require different amounts of batter as well as different cooking times. I have found 4 minutes to be the best for my waffle iron).
5. If you're going to freeze your waffles the best way to prep them is to cool them on a cooling rack and then you can freeze them however you like. I like to cut them into quarters and freeze them in a ziplock back so they can be taken out any morning and heated up in the toaster.
This was a recipe from one of our themed travel nights and it was delicious!! "Traveling" while social distancing has been very key to keeping us in good spirits. I'm not sure why it has helped as we rarely go out to eat but I'm guessing with the lack of family visits it has helped us feel connected as a family. When we do these special cooking nights it usually brings us all together over Facetime as we talk about what we had and where we "traveled" to. My parents have even started "traveling" around for some of their dinners as well. It is a fun and exciting thing to try when social distancing.
It was a beautiful day outside and we got to be out and enjoy the nice weather. Getting outside is a great way to help ease the feeling of isolation during this challenging time. Even if it is just out into your backyard or balcony, fresh air can really help heal that feeling of being trapped. We served this with Greek Rice and tzatziki sauce and a Greek salad. I usually like to pair it with either a nice fluffy pita or even Nan bread but for some odd reason tonight we didn't.
The great thing about this recipe is that it is quick and easy to make. You take all the ingredients except for the chicken breasts and mix it into a container with a lid or a zip lock bag. Cut the chicken into 1-2 inch pieces and then add to the bag. Massage the chicken in the bag and refrigerate until ready to cook. It can marinade overnight if needed. Skewer the chicken while you preheat the grill and then add the chicken onto the heated grill. Its that simple!


Ingredients
3-4 chicken breasts
3 tbsp fresh oregano or 1.5 tbsp dried
5-6 garlic cloves minced
3 tbsp olive oil
1/4 lemon juice
1/2 tsp cumin
2 tbsp fresh parsley or 1 tbsp dried
1/2 tsp chili flakes
1/2 tsp salt
1/4 tsp black pepper
Directions:
1. In a bowl with a lid or a zip lock bag, add all ingredients except chicken in the bag from the list above. Mix well and set aside.
2. Slice chicken breast into small 1 - 2 inch pieces. Add to the marinade and coat into the marinade. Cover with lid or seal bag and refrigerate for at least 30 minutes or over night.
3. Preheat grill and skew pieces of marinated chicken onto the skewers. Grill on preheated grill until chicken if fully cooked from all sides.


The best part about this recipe is that it doesn't involve multiple bowls or sifting flour. Its just a dump and mix kind of recipe. This is one that the kids love to help with as they can just dump ingredients into the bowl and watch the mixer do its job.


Ingredients:
1 1/2 cups flour
1 tsp baking soda
1/2 tsp salt
1/2 cup unsalted butter
1/2 cup firmly packed brown sugar
6 Tbsp white sugar
1 large egg
1 tsp vanilla extract
1.5 - 2 cups chocolate chips or other chocolate (mini eggs, peanut butter cups, etc)
Directions:
1. Preheat oven to 350 and either use a cookie only cookie sheet or line cookie sheets with parchment paper.
2. In your mixer, mix at medium speed butter, brown sugar and white sugar until blended and smooth.
3. Add the egg and vanilla extract and mix on low speed.
4. Add flour, baking soda and salt to the butter mixture and mix on low speed until just incorporated. (make sure you don't over mix)
5. Next add in the chocolate and give it a quick mix.
6. Next using a tablespoon, spoon out the dough and make it into balls before placing it onto the cookie sheet.
7. I bake the cookies 1 sheet at a time for optimal cookie cooking lol and they can take anywhere from 8 - 13 minutes depending on the size.
8. remove cookies from cookie sheet and place on cooling rack to cool completely.
These are so good!!! We made this recipe for company, when having company over was allowed. I am already dreaming of the next time I can make them as there was so much flavour. The best part about this recipe is that you can make the red enchilada sauce and chicken a head of time or make it to eat right away. We were having company over this night and I knew I wouldn't want the house to be messy or to feel like I was busy running around trying to get dinner ready while they were over. This recipe meant I could have the chicken, sauce and tortillas made and ready to be rolled up into the enchiladas and then baked in the oven in time for dinner. I also had time to clean the kitchen before they came and I got to enjoy the time we had with them. We also served Mexican Rice as a side to go along with the enchiladas, and our company brought a delicious bean salad!
We love this recipe! Its fairly quick to make and really easy to follow... what more could you ask for right?!? They add extra flavour to whatever you are using them with. We have also used these tortillas for tacos, fajitas and quesadillas. We even like to eat them dipped in hummus or tzatziki sauce. I add Garlic or Italian flavoured oil to them as I like the extra flavour that it gives them. We also like this recipe because you can make them a head of time and they are still super soft. I do usually make them right before dinner as we like how warm they are coming off the pan but on really busy nights I can make them a head of time and they still taste great.
This time I made them because I was making a chicken enchilada dinner (Post coming soon) for some friends that we had coming over. We were supposed to be in Arizona and they were supposed to be in Mexico so we all needed a little pick me up get together. I knew that these would be the perfect mix with the enchilada sauce to take this meal to the next level. I made them a head of time as I knew they would heat up in the oven when I baked the enchiladas. I also knew I wanted to make them a head of time so I could clean up the kitchen before our company came over.
First thing is to mix all the dry ingredients together in your stand mixer with hook attachment (or bowl if mixing by hand). Next you're going to add your water and oils and mix for approximately 2 minutes (giving the sides a scrape 1 or 2 times). Once the dough has started to come together into a ball, take out of the mixer and knead by hand until dough is nice and smooth. Split the dough into equal sized balls and place onto a well floured surface. Slightly press down onto the balls and then cover with a tea towel. Let rest for 15 minutes to 1 hour.

I usually let them rest for an hour as I find them easier to work with. Heat the pan onto medium - high heat. While the pan is heating up I like to roll out as many tortillas as I can so they are ready to go into the pan. Cook for 1 minute to 30 seconds a side (depending on how hot your pan is). While they are cooking I continue to roll out the rest of the tortillas stopping to check on them and flipping when needed. You will know it is ready to flip when it starts to bubble.


Ingredients
3 cups flour
1 tsp salt
1 tsp baking powder
1 tbsp garlic olive oil
5 tbsp olive oil
1 cup hot water
Directions:
1. using your stand mixer with the dough hook, mix flour, salt and baking powder. Mix briefly
2. With the mixer running at medium speed, add oil and water to flour mixture. Mix for 1-2 minutes, stopping and scraping the sides if needed.
3. After the dough has come together into a ball, reduce speed to low and continue to mix for another 1-2 minutes or take out of the bowl and mix by hand until the dough is smooth.
4. move dough to a well floured surface and divide into 14 - 16 equal portions. Roll into small dough balls and press palm into ball to slightly flatten. Cover with a tea towel and let rise for 15 min - 1 hour.
5. when ready to cook, warm a large pan over medium heat.
6. keeping the working area well floured, roll each ball out into a round tortilla approximately 6" in diameter.
7. Transfer tortillas one at a time into the hot skillet and cook for about 1 minute (30 seconds a side) you will see it starting to bubble.
8. Remove from pan and stack, you can cover them with a tea towel to keep them warm and pliable.
9. you can store them for 2-3 days if stored in the fridge and in a zip lock bag or for 2 - 3 months in a zip lock bag in the freezer.
On a not so chilly day this stew was still exactly what we needed. We spent much of the day outside enjoying the early spring like weather which didn't allow me to simmer the stew for as long as I usually do. We had a quiet morning to start and once the sun was shining and my son was home from hockey we went to the end of the road to climb and explore the big snow hill. It is really slippery and steep which made it a fun challenge for my oldest son and I. The snow is really starting to melt and we can now see the pavement on the road in front of our house. This was an exciting feature as my oldest son got a new bike for Christmas and has been asking to ride it since the nicer weather has started. My husband took the boys out on their bikes, pushing my youngest son on the handled tricycle. While my husband did this I took time to fold the laundry and start dinner. I also took breaks to go outside and cheer the boys on biking and to take pictures and videos to post on Tiny Beans. If you haven't heard of Tiny Beans please check out my Keeping Family Memories post as it talks not just about Tiny Beans but also of other ways to keep track of family memories.
This stew is very hearty and there is lots of flavour, not to mention it is easy to make and calls for wine. Obviously the longer you let it simmer the more flavour it has. I also recommend mincing garlic and not using granulated garlic as it adds way more flavour! I am a garlic person and usually add more garlic than what a recipe calls for. I also always mince my garlic as the flavour is much stronger!
Start by adding the stew meat into the pot with some olive oil, salt and pepper. Let me meat cook and then add in some flower before removing it from the pot. While the meat is cooking it is a great opportunity to crack open that bottle of wine! Once the meat is cooked set it aside and add more olive oil to the pot. Now add in your onion, celery, carrots, minced garlic and spices. Let them sweat a bit and before adding some of your wine (I don't use an expensive wine for this as you loose a lot of the wine flavour when cooking with it, but I do use one I like as I am also drinking it). Give them a stir and let marinade in the wine for a minute or two before adding in the beef stock and worchestershire sauce. Once you've brought it up to a boil reduce the heat, add a bay leaf and let simmer. This is when all the flavours from the spices will come out and make the flavour that much better!
When you're about 30 - 45 minutes away from eating add in the remaining wine, frozen peas and potatoes. This will allow the potatoes to cook but not over cook and same for the peas. This is a nice hearty meal that will be a favourite of the entire family. Making some nice homemade prospector buns or even some homemade tortillas to dip into the stew would take this meal to the next level!
Tonight we didn't have a lot of time to let it simmer as we were busy outside enjoying the warmer weather so I added some extra minced garlic and other seasoning to add to the flavor. Below if the recipe if you are going to let it simmer.
Ingredients:
1lb moose chunks
4 tbsp olive oil (divided)
1/4 cup flour
1/2 cup red wine (divided) + more for drinking
4 cups beef stock
4 - 6 carrots
1 celery stalk
4-5 potatoes
1 - 2 onions
2 cups frozen peas
6 garlic cloves minced
1.5 tsp oregano
1 tsp parsley
1 tsp rosemary
1 tsp basil
2 tsp worchestershire sauce
1 bay leaf for simmering
salt and pepper to taste
Instructions:
1. heat oil in stew pot and add meat to brown/cook. Add salt and pepper and cook. Once meat is close to being cooked add flour and stir. Remove meat from pot and set aside.
2. Add remaining oilve oil and diced onion, celery and chopped carrots. Add in minced garlic and spices and let them begin to sweat.
3. Add in 1/4 cup of red wine, meat and any other spices you may want to add (we sometimes add chili flakes to add some kick to the stew). Give it a stir and a mix it all well.
4. Add in beef stock and bring it up to a slow boil and then reduce the heat. Add in worchestershire sauce and bay leaf and simmer some more. (simmer for time if you have it as it will bring out more of the flavours from the spices but if you don't have time to simmer then move onto the next steps right away)
5. Add the remaining wine, frozen peas and potatoes and stir occasionally making sure nothing sticks to the bottom. Cook for approximately 30 minutes to allow potatoes to cook.

**None of these links are ads and just links to items I like and used**
My Family LOVES pizza! But lets be honest, who doesn't?!? Where we live it is expensive to buy a pizza and they generally are thick crust and some places are too greasy. This is what got me onto the idea of making our own pizza. It seemed like such a difficult task and I honestly was afraid I'd mess it up. However, the first pizza was a success! It wasn't a thin crust but it held together and tasted good. After making pizza for a couple of years now I have mastered the thin crust and also come up with a recipe that I like.
One thing that I like to add to my dough recipe is Garlic flavoured Olive Oil. Olive Tasting Room has a great selection of different flavoured oils and vinegar's which I also use to make great tasting salad dressings as well. Adding the Garlic oil to the pizza dough gives it a great garlic taste and to be honest, that oil is so over powering that you can't really use it for anything else. If you are using it for a salad dressing be cautions as to how much you add as it really can be too much for even a Caesar salad dressing. I've also considered adding the Italian Herb, Basil, or Rosemary flavoured oil to the dough instead of the garlic. But to be honest the hint of garlic just makes the dough taste so good I can't not add it. But I am also a garlic person! When a recipe calls for 2-4 cloves of garlic I usually add 6-8 cloves.
I use my Kitchenaid Stand Mixer with the dough hook to mix ingredients into the yeast mixture as well as when kneading the dough. If the dough doesn't look like it has come together enough or like it is too sticky, I will add flour to the counter and finish kneading it by hand to make sure it isn't too sticky and has come together just right. If you don't have a stand mixer you can definitely knead it by hand, it will just take a little more muscle power :)


Another helpful tip: I recently found out my oven has a proofing option. This keeps the oven at an ideal temperature for rising bread and dough. This has helped my dough rise perfectly! Also when rising dough in the oven you do not need to cover it. I've only used the proofing option when rising the dough the first time in a large bowl as I start to heat the oven and the pizza stones when the dough is rising in its smaller balls on the counter (the second time it rises). Pizza stones are another important part of getting that perfect crispy thin crust as it heats the dough so well and gives it a nice crust. Make sure to sprinkle cornmeal on your pizza stone before putting the crust on it or you could be scraping the pizza off in pieces with a spatula as it tends to stick to the stone.

Once dough has risen the second time (45 min - 1 hr), roll it out on a floured surface. Make sure to add a little flour to the top as well, otherwise your rolling pin may stick. I had the best rolling pin as it really let you dig down and roll out the dough and the dough rarely stuck to it. It was very similar to the Mrs Anderson's Baking Pastry and Pizza Roller but with the amount of pizza we eat and my extremely strong muscles... it broke. Now that I am writing this post it gave me the idea to google the rolling pin (funny it took me to write this post to actually look it up). I will be ordering another one!!! It was honestly the best pizza roller ever! I was so sad when it broke and was trying to find a way to fix it with my husband... no luck.


Once the dough is rolled out. Sprinkle the cornmeal onto the heated stones. Add the dough on top and fold over and edges that are hanging over into a crust shape. This will prevent toppings from falling off into the bottom of the oven or BBQ. Add your pizza sauce, toppings and cheese and then bake. As stated before we are a family that likes to eat meat so we generally have 2-3 different types of meat on our pizza and then my husband and I will add other vegetables to ours. The boys just like meat and cheese. I have found that the Cracker barrel Pizza cheese is the best pre shredded mozzarella cheese as it's not too greasy and melts nicely. Obviously getting nice fresh mozzarella is the best but where we live that's not always an option. Another great pizza option is the margarita pizza. I like to make this one in the summer when I can pick the basil fresh off the plant and use our homegrown tomatoes to make the sauce.
As you can see I always make the thin crust option (4 dough balls). I have two different sized pizza stones so I make the balls the size I will need according to the size of my stones. You can then choose to cook the pizza either in the oven or on the BBQ. We love the extra flavours that tend to come when cooking the Pizza on the BBQ. It was also a beautiful weekend this weekend and took full advantage of the beautiful weather outside! The pictures below are of the pizzas cooked on the BBQ.

Ingredients:
1 tsp granulated sugar
1 1/2 cups warm water
1 packet Fleischmann's Quick-Rise Instant Yeast
1 Tbsp Garlic flavoured Olive Oil (personally I use Olive Tasting Room Oil)
1 tsp salt
3 1/2 cups flour (more for kneading)
Directions:
- Add sugar and water into the mixer and mix until sugar has dissolved. Add yeast and let rest for 10 minutes.
- Add oil and salt into the mixer and mix into mixture.
- Add Flour and give a little mix after each cup has been added. Mix for approximately 5 - 10 minutes. This is where you can take it our and finish kneading it on the counter if it doesn't look like the mixer is getting it all together or if it looks too sticky. Just add small amounts of flour at a time to the counter and knead until you get a good smooth dough.
- Place dough into a greased bowl (I just spray a bowl with Pam before adding the dough into it to rise) Either cover the dough and let it rise on your counter OR place dough into the oven when set to Proof. Let dough rise 1 - 1.5 hours.
- Divide dough - Thick Crust (2 dough balls); Thin Crust (4 dough balls) - and let rest on floured surface and cover. Let rise for 45 min - 1 hour.
- Preheat oven or BBQ to 425 and preheat stones at this time.
- make sure when rolling out your dough it is on a floured surface and that you add flour to the top of the dough as well. This will stop it from sticking to your rolling pin.
- Once dough is rolled out, sprinkle cornmeal onto heated pizza stone and place dough on top. Fold over any hanging edges. Add desired topping and Bake :)
- Bake Pizza 16 - 20 minutes in the oven OR 11 - 13 minutes on the BBQ (our BBQ tends to cook the pizzas quicker than in the oven even though the temperature is roughly the same)

**None of these links are ads and just links to items I like and used**
We had a great day today enjoying the beautiful weather and the warmth of the sun! The morning was a blast playing with friends at the gym and then stopped at the grocery store to pick up the last couple ingredients that we needed for these burgers. We decided to head to the ODR (outdoor rink) in the afternoon as our youngest son is always wanting to get out on the ice whenever his brother is out there. My oldest son also loves to play 1v1 against his dad to try to beat him. The sun was out and there was little to no wind today. It was so beautiful and a reminder that warmer days are coming. My youngest son had an absolute blast out on the ice. We brought our skate assist and I helped him keep his heels from rolling forward and he was skating! He was so happy and excited to be out on the ice and outside it made the rest of us happy and proud of him. My oldest son skated around with a smile on his face while playing 1 v 1 against his dad and then took a turn in the goal when he and his dad played 2 v 2 against some other kids. They other kids were great with him (as he was the youngest one out there) making sure not to shoot too hard and not at his body. He made some great stick saves!
When we got home we went into the backyard to play in the sun and relax. My oldest son brought out his target shooting game and was challenging his dad to see who could get the highest score. My youngest son was exploring under the deck to see which car toy he would want to play with. It was great. Now it was time to prep the burgers! I like to prep the burgers at least 1/2 an hour before making them to let them sit in the fridge to form and hold their shape when on the BBQ.


Ingredients:
1 lb ground pork
1 Grated Granny Smith Apple
1/4 - 1/2 cup Italian bread crumbs
1.5 tsp Dijon mustard
1 tsp rosemary
Salt and pepper to taste
Directions:
1. Grate Granny Smith Apple and then squeeze out excess juices. Leave some juices in as it adds to the juiciness to the burgers.
2. Mix all ingredients together and form into 4 burger patties.
3. Start BBQ and warm to medium heat. Cook for 5-7 minutes and side or until done.

We bought fresh hamburger buns from our local grocery store and topped the burger with tzatziki sauce to add a little more flavour. They were delicious! The best part about this meal was that there were no arguments from the boys about eating dinner and they just sat there and ate. Parenting WIN!

**None of these links are ads and just links to items I like and used**
If you couldn't tell we are a meat eating family. We hunt and catch most of our meat (moose, deer, grouse, fish) and try to buy locally raised meat when possible. My Husbands cousin raises pigs and chickens and then gets them butchered and sells them. We get the occasional chicken from her but usually get a 1/2 a pig and it gets butchered into various items. We got a lot of hams this year. They're nice and small 1-2 lbs and the perfect size for our family. The place that she got them butchered this year did an amazing job! They were done at Huber's Bavarian Meats and they are smoked just right. Everything we have had so far has been delicious. From the bacon to the pork chops and even the schnitzel!
I think we might even take some bacon out for a nice big family breakfast one morning this weekend because that's what weekends are all about! We love to spend time together as a family, doing activities with the boys. Saturday mornings are tot time with fellow friends and their kids. We all get together at the gym and let the kids run around for an hour, just burning energy and playing games. We then all sit down for a post play snack so the kiddos can refuel and chat/laugh. This time is so nice to watch as they come up with the funniest things to say and really are just having the best time possible.
As a family we do enjoy a good ham! Below you will find a recipe for a ham with a Brow Sugar Glaze. Our hams are small so if you're making a larger ham just double-triple the ingredients to make sure there is enough to go around.
Our go to meat marinade! I call it meat marinade as I use it on all kinds of meat. Moose steaks, deer steaks, beef steaks (if we had to buy them), pork tenderloin, I've even used it to make moose and deer jerky (would also make a good beef jerky). I personally haven't tried it on chicken but it's on our list to try.

OMG! This recipe is oh so good! When my husband was carving the chicken he couldn't stop eating it. He was even eating the skin it was that good! I can also speak to how good the skin was as I had some too and I never eat the skin. The flavour was unbelieveable and it was so crispy and juicy at the same time. I highly recommend scrolling down and finding the recipe down at the bottom.
Sunday's are usually really busy for us with my oldest son having hockey mid day, me doing my meal planning and grocery shopping, and then I usually get dinner ready before heading off to my hockey to rush home in time to sit down to dinner with the family. It's usually exhausting! But today my son didn't have hockey and neither did I. I had also already done our meal planning and grocery shopping as we were in Dryden for a hockey Jamboree and we stopped at Walmart to get what we needed for the week as well as to stock up on Pantry items. You see, when you live in a small town off the main highway you pay insane prices for groceries. So, when you have the opportunity to save some money at the big box stores you take it and run!! All this being said, we had an extremely relaxing Sunday. It was actually beautiful outside today (2 degrees Celsius) so we shoveled out the swing set and played in the backyard before heading out for a walk around the neighbourhood before lunch. Once lunch was done I was even able to take the dog out for a walk while our youngest napped!
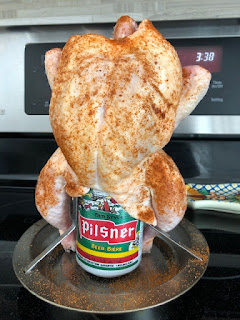
We did have to go to the store as cooking the chicken as a beer can chicken was a last minute decision and we needed to pick up some beer to cook with (drinking and BBQing). Now it was time to get started with the cooking! One thing that really helps to get a good juicy and crispy chicken is a good BBQ that holds a consistent heat. We bought our Weber BBQ 2 years ago and it is amazing! It holds its heat at a consistent temperature and is so easy to use and clean.

BBQ Beer Can Chicken
Prep Time: 15 min
Cook Time: 1 hr 15 min
Total Time: 1 hr 30 min
Ingredients:
1 3lb Whole chicken
1/2 355ml can of Beer (I used Pilsner)
1 tsp Club House la Grille BBQ chicken Spice
2 tsp Club house La Grille Chipolte Mango Spice
Instructions:
1. Pre heat BBQ or oven to 375 degrees Celsius.
2.Take nice cold beer out of the fridge and enjoy 1/2 of it. I know it will be difficult to stop at 1/2 but trust me, the juicy chicken will be worth it!
3. Place 1/2 beer into Beer can chicken roaster and then place the chicken onto the roaster.
4. Mix seasoning together and rub seasoning onto the chicken
5. Place chicken onto BBQ or into Oven and cook for approximately 1hr and 15 min.
6. Let chicken rest for approximately 5-10 minutes and then carve. It will be so juicy and delicious you will not regret making it!

**None of these links are ads and just links to items I like and used**
Chocolate Cookies


If you're going to use marshmallows it does change the consistency of the cookie and makes it chewier. I still liked it, but it definitely gives it a different texture and shape.
Ingredients:
1/2 cup butter (room temperature)
3/4 cup packed brown sugar
1/2 cup white sugar
1 tsp vanilla
2 eggs
1 1/2 cups flour
1/2 cup cocoa powder
1/4 tsp salt
1/2 tsp baking soda
2 cups (whatever your heart desires. We have done Reece pieces, a combination of mini marshmallows white chocolate chips and milk chocolate chips. I'm thinking some salted peanuts would also taste really good in these cookies as well!)
Directions:
1. Heat oven to 350 degrees
2. Put butter and sugars into your bowl and mix until creamed. Add vanilla and eggs and cream together until well mixed.
3. Add flour, cocoa powder, salt and baking soda to the mixture and mix well.
4. Next you are going to add in your filler and mix until there is well spread throughout the cookie dough.
5. Spoon onto cookie sheet and give room for them to spread (especially if using marshmallows. I would also suggest parchment paper if using marshmallows and they melted a lot and got really sticky on the pan). Cook for 9 - 13 minutes depending on the size of your cookies.
6. Move onto cooling rack and enjoy!
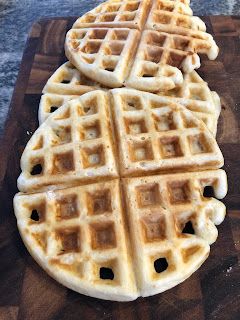
Waffles

This waffle recipe is actually so easy! I make this recipe all the time and the best part is that they freeze really well! I like to cut them into quarters and freeze in a ziplock bag as that makes them easy to access and the perfect size to pop into the toaster to heat up.


Do not over mix your batter but do mix it well enough that everything is mixed well. I know... how do you know when its just right? Well the nice thing about this is the more you make it the better you understand BUT if you do happen to over mix (like I did a lot at the beginning) they still turn out!


Just think about how fun it will be once we are allowed to have gatherings again to have a waffle bar at a brunch! Or if you don't want to wait for that then you can always have a fun waffle bar at a breakfast with your family.
Ingredients:
1 3/4 cups flour
1 TBSP Baking powder
1/2 tsp salt
1/2 cup melted butter
1 3/4 cups milk
2 eggs
1 tsp vanilla
Directions:
1. Melt butter in microwave.
2. In large bowl mix flour, baking powder and salt together.
3. in a medium bowl mix eggs, vanilla, and milk together. Add melted butter to the wet mixture and then add the wet mixture to the flour mixture and mix. Try not to over mix.
4. Let the batter rest for 5 minutes. While the batter is resting pre heat your waffle iron. Next scoop approximately 1/3 cup of batter onto your waffle iron and cook. (Every waffle iron will require different amounts of batter as well as different cooking times. I have found 4 minutes to be the best for my waffle iron).
5. If you're going to freeze your waffles the best way to prep them is to cool them on a cooling rack and then you can freeze them however you like. I like to cut them into quarters and freeze them in a ziplock back so they can be taken out any morning and heated up in the toaster.
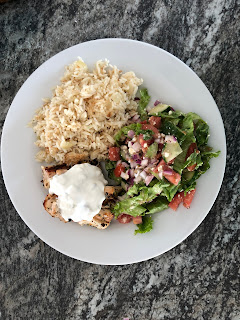
Chicken Souvlaki

This was a recipe from one of our themed travel nights and it was delicious!! "Traveling" while social distancing has been very key to keeping us in good spirits. I'm not sure why it has helped as we rarely go out to eat but I'm guessing with the lack of family visits it has helped us feel connected as a family. When we do these special cooking nights it usually brings us all together over Facetime as we talk about what we had and where we "traveled" to. My parents have even started "traveling" around for some of their dinners as well. It is a fun and exciting thing to try when social distancing.
It was a beautiful day outside and we got to be out and enjoy the nice weather. Getting outside is a great way to help ease the feeling of isolation during this challenging time. Even if it is just out into your backyard or balcony, fresh air can really help heal that feeling of being trapped. We served this with Greek Rice and tzatziki sauce and a Greek salad. I usually like to pair it with either a nice fluffy pita or even Nan bread but for some odd reason tonight we didn't.
The great thing about this recipe is that it is quick and easy to make. You take all the ingredients except for the chicken breasts and mix it into a container with a lid or a zip lock bag. Cut the chicken into 1-2 inch pieces and then add to the bag. Massage the chicken in the bag and refrigerate until ready to cook. It can marinade overnight if needed. Skewer the chicken while you preheat the grill and then add the chicken onto the heated grill. Its that simple!


Ingredients
3-4 chicken breasts
3 tbsp fresh oregano or 1.5 tbsp dried
5-6 garlic cloves minced
3 tbsp olive oil
1/4 lemon juice
1/2 tsp cumin
2 tbsp fresh parsley or 1 tbsp dried
1/2 tsp chili flakes
1/2 tsp salt
1/4 tsp black pepper
Directions:
1. In a bowl with a lid or a zip lock bag, add all ingredients except chicken in the bag from the list above. Mix well and set aside.
2. Slice chicken breast into small 1 - 2 inch pieces. Add to the marinade and coat into the marinade. Cover with lid or seal bag and refrigerate for at least 30 minutes or over night.
3. Preheat grill and skew pieces of marinated chicken onto the skewers. Grill on preheated grill until chicken if fully cooked from all sides.

Lemon Parmesan Trout
This is a new recipe that we tried the other night. I'm not a huge Trout fan. I find that they tend to have more of a fishy taste than a Crappie or a Walleye. But this recipe is good and takes away that fishy taste (that most people can't even taste). The lake we fish at has nice pink Lake Trout and would have a similar taste to a Salmon. This fish was previously frozen and I can just imagine how much better it would taste coming right off the lake and cooking it up. The boys generally like their fish white and breaded but they both enjoyed this recipe as well.
This is a nice easy recipe which I also love. During normal times we are generally a busy family during the week and having quick meal options that also taste great are a huge hit with my husband and I. I have definitely been trying a lot of new recipes to see what we like and what we don't like. We've also been taking on a lot more recipes that take more time but have been making extras to put in the freezer. This will hopefully come in handy once things are a little more normal.
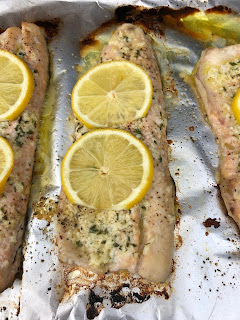


Ingredients:
4 Trout Filet
2 Tbsp Olive Oil
3-4 cloves garlic
2 Tbsp fresh Parsley or 1 Tbsp dried parsley
1 Lemon (Slice 1/2 and juice the other)
3 Tbsp fresh Parmesan
Salt and Pepper to taste

Directions:
1. Preheat oven to 400 or light BBQ to get to 400 and line baking sheet with aluminum foil
2. Place filet skin side down on baking sheet
3. In a small bowl, stir together olive oil, parsley, garlic, and juice from 1/2 the lemon and Parmesan.
4. Sprinkle salt and pepper on the fish and then pour the oil mixture over the fish and gently spread the mixture to coat the fish.
5. Top with sliced lemon
6. Bake for approximately 15 - 20 minutes or until fish is flaky

This is a nice easy recipe which I also love. During normal times we are generally a busy family during the week and having quick meal options that also taste great are a huge hit with my husband and I. I have definitely been trying a lot of new recipes to see what we like and what we don't like. We've also been taking on a lot more recipes that take more time but have been making extras to put in the freezer. This will hopefully come in handy once things are a little more normal.

We decided to cook it on the BBQ but it could also be cooked in the oven. Either option works well and you will cook at 400 on either option. First you will mix the rub together to get it ready to be put onto the fish. Next you will put the fish onto a pan that is covered with tinfoil. Sprinkle salt and pepper onto the fish and then cover with the lemon Parmesan rub. Place lemon slices on top of the fish and now you are ready to cook!


Ingredients:
4 Trout Filet
2 Tbsp Olive Oil
3-4 cloves garlic
2 Tbsp fresh Parsley or 1 Tbsp dried parsley
1 Lemon (Slice 1/2 and juice the other)
3 Tbsp fresh Parmesan
Salt and Pepper to taste

Directions:
1. Preheat oven to 400 or light BBQ to get to 400 and line baking sheet with aluminum foil
2. Place filet skin side down on baking sheet
3. In a small bowl, stir together olive oil, parsley, garlic, and juice from 1/2 the lemon and Parmesan.
4. Sprinkle salt and pepper on the fish and then pour the oil mixture over the fish and gently spread the mixture to coat the fish.
5. Top with sliced lemon
6. Bake for approximately 15 - 20 minutes or until fish is flaky

Super Soft Chocolate Chip Cookies
This cookie recipe is so easy and oh so delicious!!! We recently added cookie making about once every second week to our home school schedule. The school I work at and my son goes to, has an event called Fun Food Friday that happens every Friday afternoon. It involves the kids creating a fun healthy snack, crafts and organized games. The grade 5-6 leadership classes take turns planning the events and it is a fun time for everyone! My sons teachers also do cooking Friday mornings. The kids all get an opportunity to help make some kind of snack/treat for the class. He really loves this and misses cooking with his teachers. He was so proud last Wednesday when he go to show my husband how good of a cook he is when he made me breakfast in bed for my birthday (it was delicious!). So I have tried to add in at least 1 cooking day a week where we make something. I usually use this cookie recipe every other week as they tend to go fast!


This recipe will make anywhere from 18 - 30 cookies depending on their size. I have substituted the chocolate chips with other forms of chocolate (Peanut butter cups, mini eggs, rolos, ect). Its easiest if you freeze the other forms of chocolate first and then break them up before adding them to the cookie batter.


The best part about this recipe is that it doesn't involve multiple bowls or sifting flour. Its just a dump and mix kind of recipe. This is one that the kids love to help with as they can just dump ingredients into the bowl and watch the mixer do its job.


Ingredients:
1 1/2 cups flour
1 tsp baking soda
1/2 tsp salt
1/2 cup unsalted butter
1/2 cup firmly packed brown sugar
6 Tbsp white sugar
1 large egg
1 tsp vanilla extract
1.5 - 2 cups chocolate chips or other chocolate (mini eggs, peanut butter cups, etc)
Directions:
1. Preheat oven to 350 and either use a cookie only cookie sheet or line cookie sheets with parchment paper.
2. In your mixer, mix at medium speed butter, brown sugar and white sugar until blended and smooth.
3. Add the egg and vanilla extract and mix on low speed.
4. Add flour, baking soda and salt to the butter mixture and mix on low speed until just incorporated. (make sure you don't over mix)
5. Next add in the chocolate and give it a quick mix.
6. Next using a tablespoon, spoon out the dough and make it into balls before placing it onto the cookie sheet.
7. I bake the cookies 1 sheet at a time for optimal cookie cooking lol and they can take anywhere from 8 - 13 minutes depending on the size.
8. remove cookies from cookie sheet and place on cooling rack to cool completely.
Chicken Enchiladas
These are so good!!! We made this recipe for company, when having company over was allowed. I am already dreaming of the next time I can make them as there was so much flavour. The best part about this recipe is that you can make the red enchilada sauce and chicken a head of time or make it to eat right away. We were having company over this night and I knew I wouldn't want the house to be messy or to feel like I was busy running around trying to get dinner ready while they were over. This recipe meant I could have the chicken, sauce and tortillas made and ready to be rolled up into the enchiladas and then baked in the oven in time for dinner. I also had time to clean the kitchen before they came and I got to enjoy the time we had with them. We also served Mexican Rice as a side to go along with the enchiladas, and our company brought a delicious bean salad!
We all look forward to the day when we can all get together with family and friends again and this day will come! It is important to stay positive as it is really easy to get over paranoid and upset about even the littlest of things. Everyone is going through this Pandemic and everyone will cope in their own way and that is why it is important not to judge people on how they cope but also offer support when needed. (that's the end of that rant lol)
Now back to the recipe...
Mix the chicken broth, diced tomatoes, onion and garlic powder together in a pot and bring to a simmer. Once simmering add the chicken breasts and let it simmer for approximately 30 minutes.While the chicken was simmering in the mixture I made the red sauce. Its super easy to make and really does have a lot of flavour to it. Like I stated, I made the sauce and chicken a head of time so that I could clean my kitchen before out company came over.

Once it was time to assemble, I got all the ingredients out and put them together. Placing cheese, chicken and then sauce into the homemade tortillas (that I had also already made a head of time). Rolling them up and then placing them into the baking dish that also has a layer of sauce on the bottom.

You can also spread any left over red sauce on top before adding the shredded cheese. I didn't have any left over as I also had a separate dish of lactose free enchiladas as one guest is sans lactose.

Ingredients:
2 whole chicken breasts
2 cups chicken broth
1 540 mL can diced tomatoes with chilies
1 tsp garlic powder
1 medium onion
homemade red enchilada sauce
12 homemade tortillas or 12 store bought tortillas
3 cups shredded cheese (I used the cracker barrel Tex Mex cheese)
Homemade red enchilada sauce:
2 Tbsp oil
2 Tbsp flour
4 Tbsp Chili powder
1/2 tsp garlic powder
1/2 tsp cumin
1/2 tsp salt
1/4 tsp onion powder
1/4 tsp cayene pepper
2 cups chicken broth
Direction:
1. Place the diced onion, chicken broth, diced tomatoes garlic powder and chicken breasts in a large sauce pan and simmer for approximately 30 minutes or until chicken is tender enough to shred.
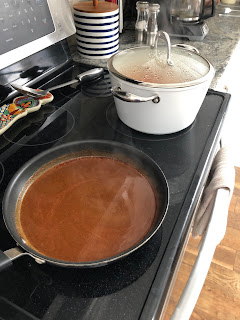
2. While the mixture is simmering you can make the red enchilada sauce. Place flour and oil in a sauce pan over medium heat. Whisk and cook the mixture until it boils and then cook for another minute or two after that. Whisk in the seasoning and chicken broth until well blended. Reduce heat to low and whisk for approximately 10 minutes until the sauce has slightly thickened.
3. Let the mixture cool and remove chicken breasts from the mixture. Shred chicken breasts and discard the rest of the mixture.
4. Preheat oven to 400 degrees
5. Spread some enchilada sauce onto the bottom of your baking dish. Next add cheese, chicken and some enchilada sauce to each tortilla and roll up before placing into the baking dish. If you have left over sauce you can also spread some sauce on top of the enchiladas before adding the cheese on top as well.
6. Sprinkle the top with cheese and bake for 20 - 25 minutes.


Mexican Rice
This dish is delicious! We missed out on our March Break Trip to Arizona due to the coronavirus and wanted a pick me up dinner with our friends who also cancelled their trip to Mexico. We decided we wanted to get together and it was our turn to host. We had a great night as they have a son the same age as our oldest. The boys all ran around the basement (the oldest two playing games and my youngest just chasing after them). Dinner was also a huge hit with all the boys which meant the rest of us all got to also sit and enjoy great conversation and a good dinner.

I knew I wanted to make a Mexican themed meal as our company was missing out on lots of good Mexican food from cancelling their trip. I also love spicy food (especially Mexican). Also once we decided to cancel our March Break trip I knew I wanted to cook a few themed meals to help make staying home a little more exciting. So far we have only had a Mexican night... But I do have Greek and Italian themed meals coming soon so keep your eyes open for those!
I decided to make chicken enchiladas with homemade tortillas. I know that when ever I have gone to Mexico I love the red Mexican rice. I just love all of the flavour that it has. So here it is...
First step is to fry the rice in oil until it gets to a light golden/translucent colour. This will take approximately 3-4 minutes. Next you will add the rest of the ingredients. I started with the chicken stock. Gave it a good stir. This was also to stop the rice from cooking further and from sticking to the pan... Next I added the tomato sauce and spices and mixed it all together. Bring the mixture to a boil, reduce heat to low/medium heat (usually a 3 on my oven and it tends to run high) cover and let simmer for 20 - 25 minutes. Sprinkle with fresh parsley to garnish if you want (It's not summer so I don't have my own parsley right now and it was way too expensive at the grocery store to buy this time). You can also add a lime wedge if you want, as I have also seen that in Mexico and at Mexican restaurants. The kicker is a bought a lime to add as a garnish for the meal and forgot to get it out of the bridge...

If you peek under the lid and give it a stir you will have to add a little extra time to cook. I didn't use the best pan this time and definitely had to peek and stir as this one sticks all the time (I should have known better).
Once the rice is done cooking, uncover and set aside to rest for a couple of minutes before fluffing with a fork. You can then transfer to a serving dish or add parsley to the pan and its ready to eat!
Ingredients:
2 Tbsp Vegetable or Canola Oil
1 cup uncooked long - grain white rice or Jasmine rice
1 1/2 cups chicken stock
1 cup tomato sauce
1 tsp chili powder
1 tsp garlic salt
1/2 tsp ground cumin
Directions:
1. Fry the rice in oil on medium/high heat until it gets to a light golden/translucent colour. (approximately 3-4 minutes)
2. Add in the rest of the ingredients and mix. ( I like to add the chicken stock first. Give it a stir and then add the rest of the ingredients)
3. Bring to a boil. Once boiling, reduce heat and cover.
4. Let simmer for 20 - 25 minutes. (If you lift the cover you will have to add a little extra time)
5. Once done cooking, uncover and remove from heat. Let rest for 2 minutes and then fluff it with a fork.
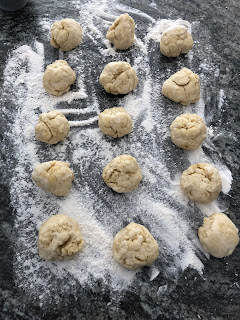
Easy Homemade Tortillas
We love this recipe! Its fairly quick to make and really easy to follow... what more could you ask for right?!? They add extra flavour to whatever you are using them with. We have also used these tortillas for tacos, fajitas and quesadillas. We even like to eat them dipped in hummus or tzatziki sauce. I add Garlic or Italian flavoured oil to them as I like the extra flavour that it gives them. We also like this recipe because you can make them a head of time and they are still super soft. I do usually make them right before dinner as we like how warm they are coming off the pan but on really busy nights I can make them a head of time and they still taste great.
This time I made them because I was making a chicken enchilada dinner (Post coming soon) for some friends that we had coming over. We were supposed to be in Arizona and they were supposed to be in Mexico so we all needed a little pick me up get together. I knew that these would be the perfect mix with the enchilada sauce to take this meal to the next level. I made them a head of time as I knew they would heat up in the oven when I baked the enchiladas. I also knew I wanted to make them a head of time so I could clean up the kitchen before our company came over.
First thing is to mix all the dry ingredients together in your stand mixer with hook attachment (or bowl if mixing by hand). Next you're going to add your water and oils and mix for approximately 2 minutes (giving the sides a scrape 1 or 2 times). Once the dough has started to come together into a ball, take out of the mixer and knead by hand until dough is nice and smooth. Split the dough into equal sized balls and place onto a well floured surface. Slightly press down onto the balls and then cover with a tea towel. Let rest for 15 minutes to 1 hour.


I usually let them rest for an hour as I find them easier to work with. Heat the pan onto medium - high heat. While the pan is heating up I like to roll out as many tortillas as I can so they are ready to go into the pan. Cook for 1 minute to 30 seconds a side (depending on how hot your pan is). While they are cooking I continue to roll out the rest of the tortillas stopping to check on them and flipping when needed. You will know it is ready to flip when it starts to bubble.

They usually start off a light golden brown at the beginning and then the brown spots get darker by the end. If you look at the last picture of me putting the enchiladas together you will notice how much darker the brown spots get. It doesn't taste burnt but adds another extra flavour to the tortillas. I also use a piece of paper towel and wipe out any extra flour in the pan ever second tortilla as that tends to smoke.

The picture below is of our dinner the other night. Here I am putting our enchiladas together to go into the oven for or very delicious dinner!

Ingredients
3 cups flour
1 tsp salt
1 tsp baking powder
1 tbsp garlic olive oil
5 tbsp olive oil
1 cup hot water
Directions:
1. using your stand mixer with the dough hook, mix flour, salt and baking powder. Mix briefly
2. With the mixer running at medium speed, add oil and water to flour mixture. Mix for 1-2 minutes, stopping and scraping the sides if needed.
3. After the dough has come together into a ball, reduce speed to low and continue to mix for another 1-2 minutes or take out of the bowl and mix by hand until the dough is smooth.
4. move dough to a well floured surface and divide into 14 - 16 equal portions. Roll into small dough balls and press palm into ball to slightly flatten. Cover with a tea towel and let rise for 15 min - 1 hour.
5. when ready to cook, warm a large pan over medium heat.
6. keeping the working area well floured, roll each ball out into a round tortilla approximately 6" in diameter.
7. Transfer tortillas one at a time into the hot skillet and cook for about 1 minute (30 seconds a side) you will see it starting to bubble.
8. Remove from pan and stack, you can cover them with a tea towel to keep them warm and pliable.
9. you can store them for 2-3 days if stored in the fridge and in a zip lock bag or for 2 - 3 months in a zip lock bag in the freezer.
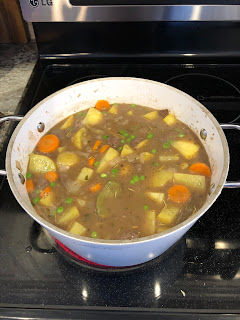
Moose Stew
On a not so chilly day this stew was still exactly what we needed. We spent much of the day outside enjoying the early spring like weather which didn't allow me to simmer the stew for as long as I usually do. We had a quiet morning to start and once the sun was shining and my son was home from hockey we went to the end of the road to climb and explore the big snow hill. It is really slippery and steep which made it a fun challenge for my oldest son and I. The snow is really starting to melt and we can now see the pavement on the road in front of our house. This was an exciting feature as my oldest son got a new bike for Christmas and has been asking to ride it since the nicer weather has started. My husband took the boys out on their bikes, pushing my youngest son on the handled tricycle. While my husband did this I took time to fold the laundry and start dinner. I also took breaks to go outside and cheer the boys on biking and to take pictures and videos to post on Tiny Beans. If you haven't heard of Tiny Beans please check out my Keeping Family Memories post as it talks not just about Tiny Beans but also of other ways to keep track of family memories.
This stew is very hearty and there is lots of flavour, not to mention it is easy to make and calls for wine. Obviously the longer you let it simmer the more flavour it has. I also recommend mincing garlic and not using granulated garlic as it adds way more flavour! I am a garlic person and usually add more garlic than what a recipe calls for. I also always mince my garlic as the flavour is much stronger!
Start by adding the stew meat into the pot with some olive oil, salt and pepper. Let me meat cook and then add in some flower before removing it from the pot. While the meat is cooking it is a great opportunity to crack open that bottle of wine! Once the meat is cooked set it aside and add more olive oil to the pot. Now add in your onion, celery, carrots, minced garlic and spices. Let them sweat a bit and before adding some of your wine (I don't use an expensive wine for this as you loose a lot of the wine flavour when cooking with it, but I do use one I like as I am also drinking it). Give them a stir and let marinade in the wine for a minute or two before adding in the beef stock and worchestershire sauce. Once you've brought it up to a boil reduce the heat, add a bay leaf and let simmer. This is when all the flavours from the spices will come out and make the flavour that much better!
When you're about 30 - 45 minutes away from eating add in the remaining wine, frozen peas and potatoes. This will allow the potatoes to cook but not over cook and same for the peas. This is a nice hearty meal that will be a favourite of the entire family. Making some nice homemade prospector buns or even some homemade tortillas to dip into the stew would take this meal to the next level!

Tonight we didn't have a lot of time to let it simmer as we were busy outside enjoying the warmer weather so I added some extra minced garlic and other seasoning to add to the flavor. Below if the recipe if you are going to let it simmer.
Ingredients:
1lb moose chunks
4 tbsp olive oil (divided)
1/4 cup flour
1/2 cup red wine (divided) + more for drinking
4 cups beef stock
4 - 6 carrots
1 celery stalk
4-5 potatoes
1 - 2 onions
2 cups frozen peas
6 garlic cloves minced
1.5 tsp oregano
1 tsp parsley
1 tsp rosemary
1 tsp basil
2 tsp worchestershire sauce
1 bay leaf for simmering
salt and pepper to taste
Instructions:
1. heat oil in stew pot and add meat to brown/cook. Add salt and pepper and cook. Once meat is close to being cooked add flour and stir. Remove meat from pot and set aside.
2. Add remaining oilve oil and diced onion, celery and chopped carrots. Add in minced garlic and spices and let them begin to sweat.
3. Add in 1/4 cup of red wine, meat and any other spices you may want to add (we sometimes add chili flakes to add some kick to the stew). Give it a stir and a mix it all well.
4. Add in beef stock and bring it up to a slow boil and then reduce the heat. Add in worchestershire sauce and bay leaf and simmer some more. (simmer for time if you have it as it will bring out more of the flavours from the spices but if you don't have time to simmer then move onto the next steps right away)
5. Add the remaining wine, frozen peas and potatoes and stir occasionally making sure nothing sticks to the bottom. Cook for approximately 30 minutes to allow potatoes to cook.

**None of these links are ads and just links to items I like and used**
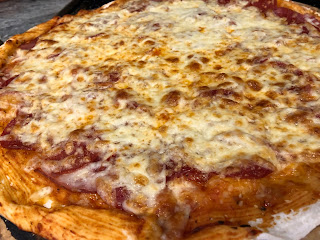
The Best Pizza Dough Recipe
My Family LOVES pizza! But lets be honest, who doesn't?!? Where we live it is expensive to buy a pizza and they generally are thick crust and some places are too greasy. This is what got me onto the idea of making our own pizza. It seemed like such a difficult task and I honestly was afraid I'd mess it up. However, the first pizza was a success! It wasn't a thin crust but it held together and tasted good. After making pizza for a couple of years now I have mastered the thin crust and also come up with a recipe that I like.

One thing that I like to add to my dough recipe is Garlic flavoured Olive Oil. Olive Tasting Room has a great selection of different flavoured oils and vinegar's which I also use to make great tasting salad dressings as well. Adding the Garlic oil to the pizza dough gives it a great garlic taste and to be honest, that oil is so over powering that you can't really use it for anything else. If you are using it for a salad dressing be cautions as to how much you add as it really can be too much for even a Caesar salad dressing. I've also considered adding the Italian Herb, Basil, or Rosemary flavoured oil to the dough instead of the garlic. But to be honest the hint of garlic just makes the dough taste so good I can't not add it. But I am also a garlic person! When a recipe calls for 2-4 cloves of garlic I usually add 6-8 cloves.
I use my Kitchenaid Stand Mixer with the dough hook to mix ingredients into the yeast mixture as well as when kneading the dough. If the dough doesn't look like it has come together enough or like it is too sticky, I will add flour to the counter and finish kneading it by hand to make sure it isn't too sticky and has come together just right. If you don't have a stand mixer you can definitely knead it by hand, it will just take a little more muscle power :)


Another helpful tip: I recently found out my oven has a proofing option. This keeps the oven at an ideal temperature for rising bread and dough. This has helped my dough rise perfectly! Also when rising dough in the oven you do not need to cover it. I've only used the proofing option when rising the dough the first time in a large bowl as I start to heat the oven and the pizza stones when the dough is rising in its smaller balls on the counter (the second time it rises). Pizza stones are another important part of getting that perfect crispy thin crust as it heats the dough so well and gives it a nice crust. Make sure to sprinkle cornmeal on your pizza stone before putting the crust on it or you could be scraping the pizza off in pieces with a spatula as it tends to stick to the stone.

Once dough has risen the second time (45 min - 1 hr), roll it out on a floured surface. Make sure to add a little flour to the top as well, otherwise your rolling pin may stick. I had the best rolling pin as it really let you dig down and roll out the dough and the dough rarely stuck to it. It was very similar to the Mrs Anderson's Baking Pastry and Pizza Roller but with the amount of pizza we eat and my extremely strong muscles... it broke. Now that I am writing this post it gave me the idea to google the rolling pin (funny it took me to write this post to actually look it up). I will be ordering another one!!! It was honestly the best pizza roller ever! I was so sad when it broke and was trying to find a way to fix it with my husband... no luck.


Once the dough is rolled out. Sprinkle the cornmeal onto the heated stones. Add the dough on top and fold over and edges that are hanging over into a crust shape. This will prevent toppings from falling off into the bottom of the oven or BBQ. Add your pizza sauce, toppings and cheese and then bake. As stated before we are a family that likes to eat meat so we generally have 2-3 different types of meat on our pizza and then my husband and I will add other vegetables to ours. The boys just like meat and cheese. I have found that the Cracker barrel Pizza cheese is the best pre shredded mozzarella cheese as it's not too greasy and melts nicely. Obviously getting nice fresh mozzarella is the best but where we live that's not always an option. Another great pizza option is the margarita pizza. I like to make this one in the summer when I can pick the basil fresh off the plant and use our homegrown tomatoes to make the sauce.
As you can see I always make the thin crust option (4 dough balls). I have two different sized pizza stones so I make the balls the size I will need according to the size of my stones. You can then choose to cook the pizza either in the oven or on the BBQ. We love the extra flavours that tend to come when cooking the Pizza on the BBQ. It was also a beautiful weekend this weekend and took full advantage of the beautiful weather outside! The pictures below are of the pizzas cooked on the BBQ.

1 tsp granulated sugar
1 1/2 cups warm water
1 packet Fleischmann's Quick-Rise Instant Yeast
1 Tbsp Garlic flavoured Olive Oil (personally I use Olive Tasting Room Oil)
1 tsp salt
3 1/2 cups flour (more for kneading)
Directions:
- Add sugar and water into the mixer and mix until sugar has dissolved. Add yeast and let rest for 10 minutes.
- Add oil and salt into the mixer and mix into mixture.
- Add Flour and give a little mix after each cup has been added. Mix for approximately 5 - 10 minutes. This is where you can take it our and finish kneading it on the counter if it doesn't look like the mixer is getting it all together or if it looks too sticky. Just add small amounts of flour at a time to the counter and knead until you get a good smooth dough.
- Place dough into a greased bowl (I just spray a bowl with Pam before adding the dough into it to rise) Either cover the dough and let it rise on your counter OR place dough into the oven when set to Proof. Let dough rise 1 - 1.5 hours.
- Divide dough - Thick Crust (2 dough balls); Thin Crust (4 dough balls) - and let rest on floured surface and cover. Let rise for 45 min - 1 hour.
- Preheat oven or BBQ to 425 and preheat stones at this time.
- make sure when rolling out your dough it is on a floured surface and that you add flour to the top of the dough as well. This will stop it from sticking to your rolling pin.
- Once dough is rolled out, sprinkle cornmeal onto heated pizza stone and place dough on top. Fold over any hanging edges. Add desired topping and Bake :)
- Bake Pizza 16 - 20 minutes in the oven OR 11 - 13 minutes on the BBQ (our BBQ tends to cook the pizzas quicker than in the oven even though the temperature is roughly the same)

Other Pizza Options:
1. This dough recipe can also be used for making homemade calzones (pizza pops) prepare the dough the same way except when its time to split it I usually split the dough into 8-12 dough balls (depending on the size of calzone you are looking for). Let rise for 45 min - 1 hour and fill with your favourite pizza toppings. Cook them for approximately 14 - 16 minutes at 425.
2. I have also used this recipe to make mini pizzas. Just like with the calzones, split the dough into 8-12 dough balls and let rise again for 45 min - 1 hr. Roll out dough and put onto heated mini pizza stones. Make sure you remember the cornmeal for the stones or the dough will stick. Add your favourite toppings and cook for approximately 14 - 16 minutes at 425. The mini pizzas are fun as they boys feel special getting their own pizza.
3. The last pizza version that I have used this recipe for is pizza buns. Picture a cinnamon bun but filled with pizza sauce and ingredients. The difference with this is after you've had the dough rise for the first 1 hr. You split it into 2 . Once you've done that roll the dough out onto a floured surface. Spread out pizza sauce and ingredients (meat, cheese, veggies, etc). Leave a little edge on one side (this will help prevent the ingredients from falling out when rolling it up). Roll the dough to make a pizza log (because you split the dough into two you will have 2 pizza logs). Cut the log into small rounds. I then put the rounds into sprayed muffin tins. Once in the tins I put them back in the oven to proof for another hour. Bake at 425 for 14 - 16 minutes.
**None of these links are ads and just links to items I like and used**
BBQ Pork Apple Burgers
We had a great day today enjoying the beautiful weather and the warmth of the sun! The morning was a blast playing with friends at the gym and then stopped at the grocery store to pick up the last couple ingredients that we needed for these burgers. We decided to head to the ODR (outdoor rink) in the afternoon as our youngest son is always wanting to get out on the ice whenever his brother is out there. My oldest son also loves to play 1v1 against his dad to try to beat him. The sun was out and there was little to no wind today. It was so beautiful and a reminder that warmer days are coming. My youngest son had an absolute blast out on the ice. We brought our skate assist and I helped him keep his heels from rolling forward and he was skating! He was so happy and excited to be out on the ice and outside it made the rest of us happy and proud of him. My oldest son skated around with a smile on his face while playing 1 v 1 against his dad and then took a turn in the goal when he and his dad played 2 v 2 against some other kids. They other kids were great with him (as he was the youngest one out there) making sure not to shoot too hard and not at his body. He made some great stick saves!
When we got home we went into the backyard to play in the sun and relax. My oldest son brought out his target shooting game and was challenging his dad to see who could get the highest score. My youngest son was exploring under the deck to see which car toy he would want to play with. It was great. Now it was time to prep the burgers! I like to prep the burgers at least 1/2 an hour before making them to let them sit in the fridge to form and hold their shape when on the BBQ.

I prep the apple first, making sure not to squeeze out all of the juices as it will add some juiciness to the burgers. Next you will add the pork, bread crumbs mustard and spices. mix well and then form 4 burger patties. While the patties are "resting" in the fridge I head back outside to play with my Family. We shoveled out the boys swing set last weekend and they love to go onto the swings. We push the boys and they have a blast. When it's time to light the BBQ we all head inside to help prep the rest of dinner. We got an actifry for Christmas and like to do our fries or potatoes in there or on the BBQ. I decided to pair our burgers with Cavendish restaurant style fries in the actifry (as a nice treat) and a nice big salad.

Ingredients:
1 lb ground pork
1 Grated Granny Smith Apple
1/4 - 1/2 cup Italian bread crumbs
1.5 tsp Dijon mustard
1 tsp rosemary
Salt and pepper to taste
Directions:
1. Grate Granny Smith Apple and then squeeze out excess juices. Leave some juices in as it adds to the juiciness to the burgers.
2. Mix all ingredients together and form into 4 burger patties.
3. Start BBQ and warm to medium heat. Cook for 5-7 minutes and side or until done.

We bought fresh hamburger buns from our local grocery store and topped the burger with tzatziki sauce to add a little more flavour. They were delicious! The best part about this meal was that there were no arguments from the boys about eating dinner and they just sat there and ate. Parenting WIN!

**None of these links are ads and just links to items I like and used**
Ham with Brown Sugar Glaze
If you couldn't tell we are a meat eating family. We hunt and catch most of our meat (moose, deer, grouse, fish) and try to buy locally raised meat when possible. My Husbands cousin raises pigs and chickens and then gets them butchered and sells them. We get the occasional chicken from her but usually get a 1/2 a pig and it gets butchered into various items. We got a lot of hams this year. They're nice and small 1-2 lbs and the perfect size for our family. The place that she got them butchered this year did an amazing job! They were done at Huber's Bavarian Meats and they are smoked just right. Everything we have had so far has been delicious. From the bacon to the pork chops and even the schnitzel!
I think we might even take some bacon out for a nice big family breakfast one morning this weekend because that's what weekends are all about! We love to spend time together as a family, doing activities with the boys. Saturday mornings are tot time with fellow friends and their kids. We all get together at the gym and let the kids run around for an hour, just burning energy and playing games. We then all sit down for a post play snack so the kiddos can refuel and chat/laugh. This time is so nice to watch as they come up with the funniest things to say and really are just having the best time possible.

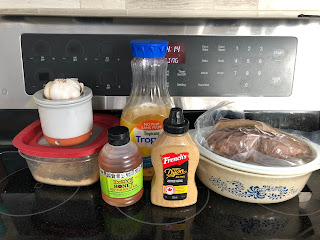
As a family we do enjoy a good ham! Below you will find a recipe for a ham with a Brow Sugar Glaze. Our hams are small so if you're making a larger ham just double-triple the ingredients to make sure there is enough to go around.
Glaze Ingredients:
1/4 cup brown sugar
3 tbs orange juice
1 tbs honey
1 tsp Dijon mustard
3 cloves garlic minced
1 tsp Heart Beat jalapeno hot sauce (optional)
3 tbs orange juice
1 tbs honey
1 tsp Dijon mustard
3 cloves garlic minced
1 tsp Heart Beat jalapeno hot sauce (optional)
Instructions:
1. Set oven to 325 degrees Celsius
2. Score ham and place in roaster or cooking dish
3. Mix all of the glaze ingredients together and whisk until mixed well. Pour glaze over ham ensuring that glaze falls into the scored crevasses of the ham.
4. Cook for 30 minutes basting the glaze over the ham every 30 minutes.
* If cooking in the crock pot/ slow cooker following the above instructions for mixing the glaze and scoring the ham and cook on low for 4-6 hours.

This glaze is so flavourful! My husband and sons couldn't get enough of the sweet yet savory taste that it gives the ham. Add in the smoked flavour from the ham meat and you have an AMAZING combination. We paired our ham with some homemade cheese and potato filled perogies and some steamed vegetables. Not the most glamorous sides but on a Friday night after a busy week it is quick, easy and delicious!

**None of these links are ads and just links to items I like and used**
Meat Marinade
Our go to meat marinade! I call it meat marinade as I use it on all kinds of meat. Moose steaks, deer steaks, beef steaks (if we had to buy them), pork tenderloin, I've even used it to make moose and deer jerky (would also make a good beef jerky). I personally haven't tried it on chicken but it's on our list to try.

A few times we have taken our meat out too late or just decided to try some steak spice for something different and we're always disappointed that we didn't add the marinade. My oldest son even likes to dip his meat into the meat juices that are on the plate as he can't get enough of the taste. We recently got a food saver for Christmas and are planning on packing and freezing some of our steak packages in the marinade. This will help us on our busy nights as it will already be marinaded for us and soak in the juices as it thaws. The following pictures are of deer steaks as that is what we took out of the freezer for tonight.


Ingredients:
1 lb of steaks or meat of choice
1/3 cup olive oil
1/3 cup soy sauce (I use China Lily because its THE BEST!)
2 tsp brown sugar
1.5 tsp Italian seasoning
5-8 cloves of minced garlic
.5 - 1 tsp hot sauce (I like heart beat blueberry habanero or the jalapeno) Optional
.5 - 1 tsp hot sauce (I like heart beat blueberry habanero or the jalapeno) Optional
Instructions:
1. mix oil and soy sauce together in a bowl, add brown sugar and mix it in.
2. add in Italian seasoning and minced garlic and mix. Transfer marinade into a ziplock bag and add the meat.
3. Marinade for a minimum of 30 minutes massaging the marinade in at least once. For extra flavour, marinade longer. I usually start the marinade in the morning and flip the bag and massage the marinade a few times throughout the day.


Grill steaks or meat to your liking. I have also made the steaks in the marinade and then fried them in a frying pan as we still like to enjoy a good steak but sometimes our extreme winter climate makes it difficult to go outside. Some winter days here make your face hurt before you've even stepped out the door. We grilled these ones approximately 4 minutes a side at about 375 degrees and were done medium-well. We also like to garnish our steak with a fresh jalapeno pepper off the plant in the summer time. Below is the final product and I can tell you there weren't any leftovers tonight!

Below are pictures of some jerky we made this weekend. It took a little longer to dehydrate because of the oil so you could even cut back on the oil if you wanted. But it really does taste great! We used to have a dehydrator that was round and blew air from the bottom. We have recently replaced it with a better one as we would always have to go out and move the racks around as the bottom rack would dry out the fastest. Our new dehydrator from Cabelas is great! The air blows out from the back and evenly distributes throughout all the trays. The jerkey all dries out evenly at the same time!


**None of these links are ads and just links to items I like and used**
BBQ Beer Can Chicken

OMG! This recipe is oh so good! When my husband was carving the chicken he couldn't stop eating it. He was even eating the skin it was that good! I can also speak to how good the skin was as I had some too and I never eat the skin. The flavour was unbelieveable and it was so crispy and juicy at the same time. I highly recommend scrolling down and finding the recipe down at the bottom.
Sunday's are usually really busy for us with my oldest son having hockey mid day, me doing my meal planning and grocery shopping, and then I usually get dinner ready before heading off to my hockey to rush home in time to sit down to dinner with the family. It's usually exhausting! But today my son didn't have hockey and neither did I. I had also already done our meal planning and grocery shopping as we were in Dryden for a hockey Jamboree and we stopped at Walmart to get what we needed for the week as well as to stock up on Pantry items. You see, when you live in a small town off the main highway you pay insane prices for groceries. So, when you have the opportunity to save some money at the big box stores you take it and run!! All this being said, we had an extremely relaxing Sunday. It was actually beautiful outside today (2 degrees Celsius) so we shoveled out the swing set and played in the backyard before heading out for a walk around the neighbourhood before lunch. Once lunch was done I was even able to take the dog out for a walk while our youngest napped!
We did have to go to the store as cooking the chicken as a beer can chicken was a last minute decision and we needed to pick up some beer to cook with (drinking and BBQing). Now it was time to get started with the cooking! One thing that really helps to get a good juicy and crispy chicken is a good BBQ that holds a consistent heat. We bought our Weber BBQ 2 years ago and it is amazing! It holds its heat at a consistent temperature and is so easy to use and clean.

BBQ Beer Can Chicken
Prep Time: 15 min
Cook Time: 1 hr 15 min
Total Time: 1 hr 30 min
Ingredients:
1 3lb Whole chicken
1/2 355ml can of Beer (I used Pilsner)
1 tsp Club House la Grille BBQ chicken Spice
2 tsp Club house La Grille Chipolte Mango Spice
Instructions:
1. Pre heat BBQ or oven to 375 degrees Celsius.
2.Take nice cold beer out of the fridge and enjoy 1/2 of it. I know it will be difficult to stop at 1/2 but trust me, the juicy chicken will be worth it!
3. Place 1/2 beer into Beer can chicken roaster and then place the chicken onto the roaster.
4. Mix seasoning together and rub seasoning onto the chicken
5. Place chicken onto BBQ or into Oven and cook for approximately 1hr and 15 min.
6. Let chicken rest for approximately 5-10 minutes and then carve. It will be so juicy and delicious you will not regret making it!

As you can see my husband paired his chicken and salad with a Nautical Disaster Dry Hopped IPA from the Lake of the Woods Brewing Company. Their Beer is delicious and if you're ever in the Kenora, ON area I also highly recommend a visit to their restaurant. The food is great, the atmosphere is even better and their shop is super cute!
**None of these links are ads and just links to items I like and used**


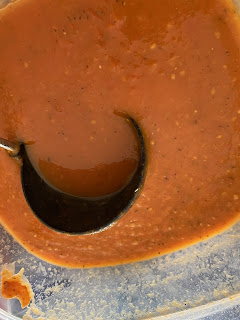
Comments
Post a Comment